DSL Support

General Connection Issues Unable to Connect to Any Websites or Get Email

If you are unable to connect to any web sites at all or check your email, this can usually be resolved by performing the following steps in order:

Important! If you are using an ActionTec DSL Gateway you should not attempt to reset the DSL router by using the reset button. Using the reset button on an ActionTec DSL Gateway can cause permanent damage to your router! The safest method to reboot the router is to remove its power cord from the electrical outlet.

If your DSL modem is training but you are still not able to get online try the following:

If you are still unable to connect please call our office at 425.818.6500 or toll free at 888.662.5274 for assistance.

Adding Additional Computers to Your Home Network

Many DSL modems provide only a single ethernet port for connecting a device to the modem. If your modem has only one ethernet port and you want to connect multiple computers to your DSL connection you will need to add either an ethernet Hub or Switch to your network. These devices are similar to phone line splitters allowing you to hook up multiple devices to a single uplink, in this case your DSL modem acts as the uplink for your network. Hubs and Switches can be found at almost any consumer electronics retailer.

Choosing between a Hub or a Switch

The primary difference between the two types of devices is in how they handle packet flow. With a Hub, data coming from the DSL Modem destined for your computer(s) is routed to all ports on the Hub simultaneously. This is inefficient as the packets are only intended for one computer yet are broadcast to all computers plugged into the hub, causing collisions and wasted bandwidth on the ports that don't need the data. The advantage is that hubs, because they are relatively "dumb", are very inexpensive.

A Switch on the other hand is "smart"—data coming from the DSL modem destined for one of the ports on the switch is directed to only that one port. This eliminates collisions and makes for a more efficient use of available bandwidth. Switches are also more secure. All packets on a hub are delivered to all ports on that hub, which means all of those packets can be viewed by all computers connected to that hub. In a home environment this is largely irrelevant. For business environments switches should be used exclusively to both improve network performance and provide an extra layer of security.

Century Link DSL Support

Century Link DSL modems include routing capabilites as part of their base functionality. This eliminates the need for after market routers in most installations. This section lists setup information and troubleshooting tips for working with these modems. This section also includes our most frequently asked support questions and tips on diagnosing and correcting problems.

My DSL connection is extremely slow. Is there something wrong with Avvanta's network?

The most common reason for DSL slowdowns is usually an application or networked computer downloading or uploading large amounts of data and using all of the available bandwidth from your DSL connection.

The following actions can usually isolate and resolve the problem. Try each of these items and check your transfer speeds using our Speed Test.

  • Stop any file transfers or peer to peer (P2P) software and close the applications associated with them.
  • Disable any personal firewall software that may be running. Century Link DSL modems include a NAT based firewall so personal firewall software is not really needed.
  • Disable any VPN software or connections that may be running.
  • Disable any sort of connection monitoring software that may be running.
  • Disable any popup-blockers, anti-spyware or anti-virus software.
  • Turn off or disconnect any other computers from the network.
  • Bypass any additional networking equipment that may be installed, including hubs, switches, routers or wireless networking equipment. Plug your computer directly into the DSL modem.

Most times slowdowns are caused by one of these things. If you are still experiencing slowdowns after trying each of these things, make sure you test using our Speed Test rather than one from another site. Using ours will make sure that it is not a problem upstream on the Internet beyond Avvanta's network.

If you continue to have problems, you can email Avvanta Support or call (425) 818-6500 or (888) 662-5274 for assistance.

How do I setup a wirless network with the ActionTec GT701-WG router?

The ActionTec GT701-WG integrates an 802.11G access point making it one of the most versatile DSL routers available. You can use any 802.11B (11 Mbps) or 802.11G (54 Mbps) wireless adapter without purchasing an additional wireless router or access point.

These instructions will help you to configure your GT701 to create a secure wireless network.

Important! In order to configure the wireless networking features of the ActionTec GT701-WG it must already be configured to use your Avvanta account. You must be connected to the ActionTec via a wired ethernet connection. Do not attempt to use these instructions from a wireles connection since they will not work. If you have not yet configured your ActionTec you should refer to our Century Link DSL Setup Guides, specifically the ActionTec GT701 and the ActionTec GT701 - SOHOxs setup guides.

Configure the ActionTec for Wireless Networking
  • Start your web browser, such as Mozilla or Internet Explorer. If it attempts to load a page, press the stop button at the top of the browser window.
  • In the Address or Location bar of your web browser, clear any address that may be present then enter http://192.168.0.1/ and press Enter.
  • In the browser window the ActionTec menu should appear. Click on the Setup/Configuration option.
  • Click Advanced Setup from the menu on the left.
  • Click Begin Advanced Setup.
  • Click Wireless Settings from the Advanced Setup menu.
  • From the Wireless Settings page, set Wireless to On
  • For security purposes, change the ESSID to something other than the default. You should use only letter and numbers for the ESSID.
  • The default channel of "1" should be fine. If you encounter weak signals or have other wireless networks in your area using the same channel, you can try adjusting the channel to improve the quality of the wireless connection.
  • Enable WEP so that only you can use your wireless network connection.
    • If you are running Windows XP with the WPA Wireless Security Update you can enable WPA instead of WEP to enhance your wireless network security.
  • You should set the Authentication Type to Shared. This will make it so that any computers that connect to your wireless network are required to have the WEP key.
    To enhance security you should use 128 bit WEP. The stronger encryption may have a slight impact on performance, but should not be noticable for normal web surfing and email.
  • In Key 1, enter either 5 (for 64 bit) or 13 (for 128 bit) hexidecimal digits for your key. A hexidecimal digit is two characters in the range of 0-9 and A-F. For example 50 A1 7B 03 64 would be a valid 64 bit WEP key. If you make a mistake entering your WEP key the ActionTec will display an error message.

    You should write down your ESSID and your WEP key and store them in a safe location. The suggested location to store these items is on a small index card taped to the bottom of your router. You will need to use these to configure any computers that will be connecting to your wireless network.

    After entering your WEP key, click Next to set up MAC address authentication.

  • A network MAC address is a unique identifier for each network adapter manufactured. With MAC authentication you can limit access to your wireless network to specific network adapters. A MAC address takes the form of 6 hexidecimal digits and is usually printed on the network adapter. You will need to locate the MAC address for each adapter you want to have access to your network before proceeding. Enabling MAC authentication is an optional step.
    • Check Enable Access List
    • Select Deny all clients
    • For each wireless adapter you want to connect to your network, enter its MAC address in the Client MAC address field and click Add to add it to the exception list and allow it to connect.
    • Click Next to proceed to the Wirelss Advanced Settings page.
    • To prevent others from being able to "see" your network you should Disable SSID Broadcast. This will force any computers that will be connecting to your wireless network to know your ESSID and your WEP key before they will be allowed to connect.
    • After setting the SSID Broadcast option, click Next.
    • Click Save and Restart from the Advanced Setup menu.
    • Click the Save and Restart button to save your settings and reboot your ActionTec.

    Configure your Computer for Wireless Networking

    The following instructions are for Windows XP only. If you are running another operating system, you should refer to your wireless adapter installation instructions or your operating system instructions.

    • Open Network Connections from your Control Panel.
      • Depending on how Windows XP is configured, there are different ways to open the Network Connections area. Select the appropriate method for your configuration:
        • Click on Start, then Connect To, then Show all connections, or
          Click on Start, then Settings, then Network Connetions.
    • Right mouse click on the icon labelled Wireless Network Connection and select Properties from the menu. If you do not have a Wireless Network Connection listed, you will need to refer to your network adapters installation instructions before proceeding.
    • From the Wireless Network Connection Properties window, click on the Wireless Networks tab.
    • Make sure that Use Windows to configure my wireless network settings is checked.
    • Click the Add button in the Preferred networks area to add a connection to your ActionTec GT701-WG.

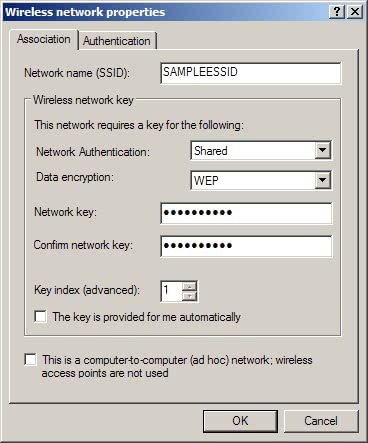
      • Enter the SSID that you configured in your ActionTec.
      • Change the Network Authentication method to Shared.
      • Remove the check from The key is provided for me automatically.
      • Enter the WEP key that you used when configuring the ActionTec in the Network key field.
      • Re-enter the WEP key in the Confirm network key field.
      • Click Ok to save your settings.
    • Click Ok on the Wireless Network Connection Properties window to save your settings.

    Windows should automatically detect the ActionTec and establish your wireless connection for you.

How do I setup a wirless network with the 2Wire 2700HG-D router?

The 2Wire 2700HG-D integrates an 802.11G access point making it one of the most versatile DSL routers available. You can use any 802.11B (11Mbps) or 802.11G (54Mbps) wireless adapter without purchasing an additional wireless router or access point.

These instructions will help you to configure your 2700HG-D to create a secure wireless network.

Important! In order to configure the wireless networking features of the 2Wire 2700HG-D it must already be configured to use your Avvanta account. You must be connected to the 2Wire via a wired ethernet connection. Do not attempt to use these instructions from a wireles connection since they will not work. If you have not yet configured your 2Wure you should refer to our Century Link DSL Setup Guides, specifically the 2Wire 2700HG-D and the 2Wire 2700HG-D SOHOxs setup guides.

Configure the 2Wire for Wireless Networking

  • Start your web browser, such as Firefox or Internet Explorer. If it attempts to load a page, press the Stop button at the top of the browser window.
  • In the Address or Location bar of your web browser, clear any address that may be present then enter http://192.168.0.1/ and press [Enter].
  • In the browser window the 2Wire menu should appear. Click on the Home Network option.
  • Lower right hand side of the screen under Wireless Settings click on Edit Settings.
  • For security purposes, change the Network Name to something other than the default. You should use only letter and numbers with no spaces for the Network Name.
  • The default channel of "6" should be fine. If you encounter weak signals or have other wireless networks in your area using the same channel, you can try adjusting the channel to improve the quality of the wireless connection.
  • Uncheck the "Enable" SSID Broadcast box.
  • The Wireless Network Security should have a check in the Enable box.
  • Authentication can be set to WEP Open, WEP Shared, or WPA-PSK.
    • WPA is the most secure protocol however not all operating systems or wireless devices support WPA. If unsure select WPA and continue with the guide. If you are unable to create a connection return to this step and select WEP Shared instead.
  • Select Use custom encryption key and enter a 10 digit hexidecimal key. (10 digits from the range zero to nine and A through F.) If you enter a 10 digit key you will use 64 bit (weak) encryption. If you enter a 26 digit key you will use 128 bit (strong) encryption. To enhance security you should use 128 bit WEP. The stronger encryption may have a slight impact on performance, but should not be noticable for normal web surfing and email.
  • In Key, enter either 10 (for 64 bit) or 26 (for 128 bit) hexidecimal digits for your key. Valid hexidecimal digits are characters in the range of 0-9 and A-F. For example 50 A1 7B 03 64 would be a valid 64 bit WEP key.

    You should write down your SSID and your WEP key and store them in a safe location. The suggested location to store these items is on a small index card taped to the bottom of your router. You will need to use these to configure any computers that will be connecting to your wireless network.

  • After entering your WEP key, scroll to the bottom of the page and click on Save leaving all other settings at their defaults.
  • Your 2Wire 2700HG-D is now configured to allow Wireless access.

Configure your Computer for Wireless Networking

The following instructions are for Windows XP only. If you are running another operating system, you should refer to your wireless adapter installation instructions or your operating system instructions.

  • Open Network Connections from your Control Panel.
    • Depending on how Windows XP is configured, there are different ways to open the Network Connections area. Select the appropriate method for your configuration:
      • Click on Start, then Connect To, then Show all connections, or
      • Click on Start, then Settings, then Network Connetions
  • Right mouse click on the icon labelled Wireless Network Connection and select Properties from the menu. If you do not have a Wireless Network Connection listed, you will need to refer to your network adapters installation instructions before proceeding.
  • Click the Add button in the Preferred networks area to add a connection to your 2Wire 2700HG-D.

    • Enter the SSID that you configured in your 2Wire.
    • Change the Network Authentication method to Shared.
    • Remove the check from The key is provided for me automatically.
    • Enter the WEP key that you used when configuring the 2Wire in the Network key field.
    • Re-enter the WEP key in the Confirm network key field.
    • Click Ok to save your settings.
  • Click Ok on the Wireless Network Connection Properties window to save your settings.

Windows should automatically detect the ActionTec and establish your wireless connection for you.